After we took our quiz in class today, which consisted of drawing three boxes on the horizontal line, above the horizontal line, and below the horizontal line, we then started drawing a car. We started with the two vanishing points and then we drew a 90 degree line through the middle of the horizontal line. Then, we did the steps to make a box and figured out how to make an extra box in the front for the hood of the car. We only had 10 minutes left in class to draw this, because our quiz took up the rest of the time, so we weren't able to draw much. But, we will hopefully be able to finish it during the next class. And, Mrs. Story also said that we will be drawing whatever car we would like, so I'm really excited for that. So far, I think the outline of my car looks pretty good - I may have made it too big, but maybe it's better for it to be too big on the page than too small. But, I'm really excited to see what my car will look like when it's done.
Today, we finished drawing our Widgetware Building. I felt like I did a better job on the shading this time than on my previous drawings and I drew my lines more neatly. I did have a little hard time writing the "WIDGETWARE INTL" on the top of the building, but then Mrs. Story told me to make sure that I wrote the letters straight up and down - disregarding the slant of the drawing. I had to redo the letters at least three times to try and get them the most upright possible. And then the little person on top. I also had a hard time drawing him and I still don't think I got his proportions right, but I tried to copy the picture in the book the best I could. I really enjoyed learning how to draw this two-point perspective drawing, so I hope we will some more of these. But I ended up putting a fair amount of time into this drawing, so I think it came out pretty well. I'm excited, though to learn more about drawing and get into some other types of art too.
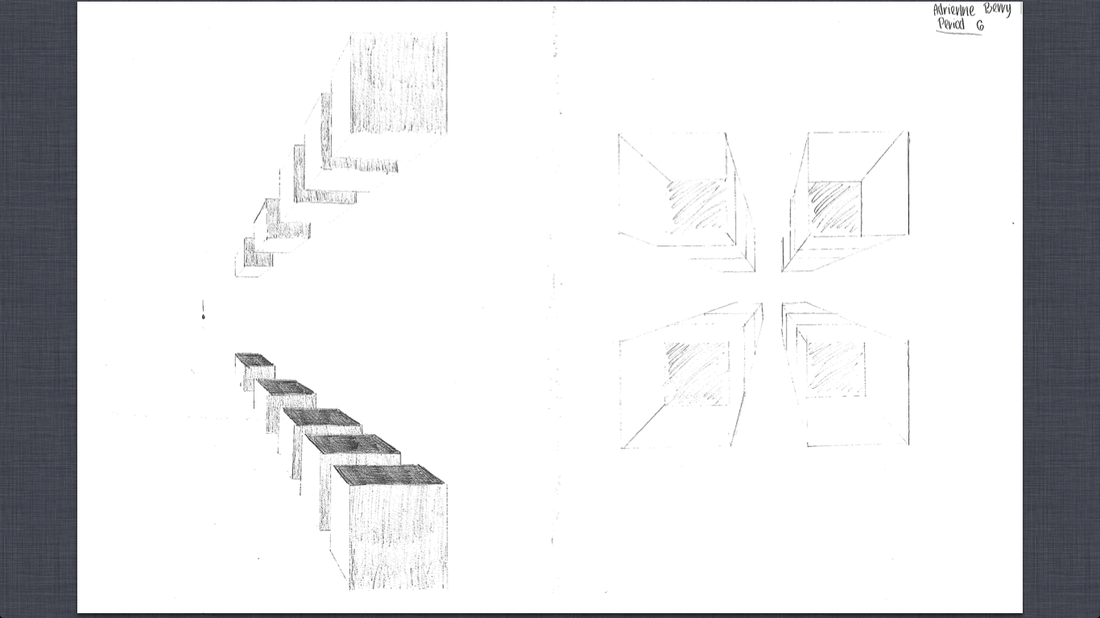
Today, we learned how to apply our knowledge of drawing boxes to make them become parts of a building, thus making a 2-point perspective. By using two vanishing points and our horizontal line, we started out by lining up our large box in the middle of our drawing with our two vanishing points and horizontal line. After drawing the actual cube, we then erased the unnecessary lines and made our box look almost like an optical illusion. We followed those same steps for the rest of our boxes and then shaded in certain areas to enhance the perspective even more. We will work on this drawing for another day, so we have not finished it yet, but I am looking forward to seeing how well my drawing will come out and what other things we will be learning next.
After we finished drawing our road, we then started to draw a school hallway. By using our vanishing point, we drew the corridor of the hall and then drew the sides of the walls and ceilings, thus showing perspective. Then, we learned how to set the doors in the wall by first drawing the outline of the door and then drawing different lines to push the door back. We drew windows and doorknobs on each door and spread each door far enough apart by drawing 90 degree lines from one side of the room to the other, thus, giving the observer a feel for the 3D dimension and reality of the room. Today, we finally finished the drawing, and added extra objects to enhance the atmosphere of the school corridor. We drew a trashcan, a poster board, patterns on the floor, and fluorescent lights in the ceiling. We completely finished the drawing by using shading to touch it up and make it feel even more realistic. For this drawing, I felt like I did a pretty good job in perspective and shading for the time I had. But, I am excited to learn more techniques about drawing so that by the time I leave this course; I will confidently be able to draw pretty much anything.
Today, we helped finish paint two paintings to sell for a fundraising at Lovett. We added dots, plain colors, lines, swirls, and outlines to enhance each of the paintings. In the first photo, we tried to keep the colors all the same; the blues, purples, and greens make a nice blend and catch the observer's eye. We also made the paintings have a textured surface, instead of a smooth surface. The small squares in the first painting are risen off the base of the painting, thus making the painting look more interesting. In the second photo, we made the flowers and heart stand out amidst the many dots and colors in the background. In this painting, too, we put similar colors together and left the heart completely red so it would stand out better and be the first thing that the observer would notice. Overall though, both of these paintings look fantastic and will definitely be easily sold at the auction.
In this drawing, we were able to add on to our basic skills of the horizontal line and vanishing point. As I mentioned in the previous post, we also enhanced the picture by drawing telephone poles, the road, the fence, the spiders, and even the space crafts in a line so they are seen in 3D. I do have to admit though, that I did have a little hard time with drawing the spiders and the clouds. I normally can look at the picture and draw what I see, but this time I really struggled with the spiders and clouds. If I had more time to work on it, I would probably make the mountains bigger, the fence lines darker, and the road darker. But by quickly sketching this drawing in two class periods, I think I did okay with it overall. Interestingly though, I have always struggled with drawing moving objects. I draw still objects best, so I would really like to work on that this semester. Overall, with the amount of time we had to draw this picture, I think my sketch came out pretty well - a few errors, but I really did try my best to make it look realistic.
In the last few classes, we've learned how to draw perspective. By using a horizontal line, vanishing point, shading, and drawing squares that we later turned into boxes, we created an image that gave us a 3D effect. At first, we drew a square and then connected the corner's of the square to the vanishing point. Then, we drew other squares behind the first one in the boundaries and then we turned them into cubes. Then, we shaded the appropriate areas and erased all unnecessary lines to make our image look real. Because we learned these steps first, we were then able to go ahead and make a more complex 3D drawing today. After we followed the steps Mrs. Story drew out for us on the board visually, we then started drawing our own image of a road, telephone poles, a fence, a truck, and even space crafts. We learned some new, interesting techniques to help us draw our 3D images just right. For example, when we drew the telephone poles, we at first started with one telephone pole and then drew it's top and bottom points to the vanishing point in the center of the page. Then, we drew another telephone pole in those boundaries and drew an angle from the top of the first telephone pole to the bottom of the second telephone pole. We then took our straight edge tool and took that angle we just drew and we drew it from the top of the second telephone pole to the bottom of the soon to be third telephone pole. After we drew that angle, we then added the third telephone pole and repeated those steps until we had a nice view of telephone poles all lined up in perspective. We followed those same steps for both the fence and the space crafts. I still think it is cool how much a little line can make such a difference in the drawing. By just adding on a few extra lines from the vanishing point to an object creates a very realistic effect that I had not known how to create before. We didn't have enough time in class today to finish the drawing, so I hope to finish it tomorrow and then put it on this blog.
Unfortunately, I was not able to finish my drawing today of the printing press rolls. So, I am not sure if I should either move more quickly through class and just do a quick sketch or actually put some more time into the details. The drawing on the right was just a sketch for me to use to help me draw the other picture on the left. Even though at first I was somewhat skeptical how I would be able to make something come alive out of a few lines, I was amazed at the end of the class that I had actually drawn something! Not that I didn't know "how" to draw, I just haven't had much experience by starting the drawing with lines and then adding on to enhance it. I also self-taught myself to press my pointer finger onto my shading areas in the drawing to make the shadows blend together and create an overall softer feeling. I had not known that little trick beforehand, and so when I thought of doing it and tried it out, I was amazed at how well it worked. However, I would like to finish my drawing sometime soon so I can feel more accomplished and know that it is done. Overall though, I had a blast in class today and thought the time period went by way too fast.
Today, we built a website in class. We learned how to use the website and paste pictures/paintings. The website we will be using will help me understand what I am doing in this class. In this way, I will be able to go back and look at my artwork and see how I have progressed.
|


 RSS Feed